Kristen Kreates

let the kitchen adventures begin…

Month: July 2021

Easy Fried Rice

Ever since I was little, I’ve had an obsession with fried rice and learning how to make it taste delicious. I still remember making it for the first time with my mom. We had followed a recipe and it didn’t turn out quite how we had wanted it to… I remember it didn’t have the right amount of soy sauce. Our neighbor made amazing fried rice and I was extremely curious to figure out how he did it. I am so excited to share with you my fried rice recipe! I have been making fried rice since I was 12 years old (I’m 25 now) and it has come a long way. Each time I make it, it turns out a little different, but this is my base recipe and it’s up to you to adjust the ingredients to your preference.

So here it goes, enjoy!

  • 2 cups of cooked rice (cold rice from the day before is best)
  • 2-3 tbsp. vegetable oil or sesame oil
  • half of a medium-sized onion, chopped finely
  • 4-5 cloves of minced garlic
  • 1 carrot, chopped
  • 1 cup of chopped broccoli or any green veggie
  • 1/4 c. Braggs amino acids
  • pepper to taste
  • 2-3 tbsp. ginger paste
  • 1 green onion, chopped
  1. Begin by chopping your onion, garlic, carrot, and broccoli
  2. Heat your pan on medium heat, add your oil, onion, and garlic
  3. Saute until the onion is soft, be careful to not burn your onion at this point
  4. Add in your carrot and broccoli and mix well. Cover your pan with a lid, turn heat low and let it steam until your broccoli is soft
  5. Add your cold rice to the pan and mix everything together well
  6. At this point, add your Braggs to the rice and once again stir completely making sure each chunk of rice is smashed and the flavor is well distributed throughout
  7. Keep your heat on low so the rice does not begin to burn. At this point, you may need to drizzle some more oil over the rice to keep it from sticking to the pan. Cover and let it warm for about five minutes, stirring occasionally
  8. Lastly, you want to add in your ginger and pepper
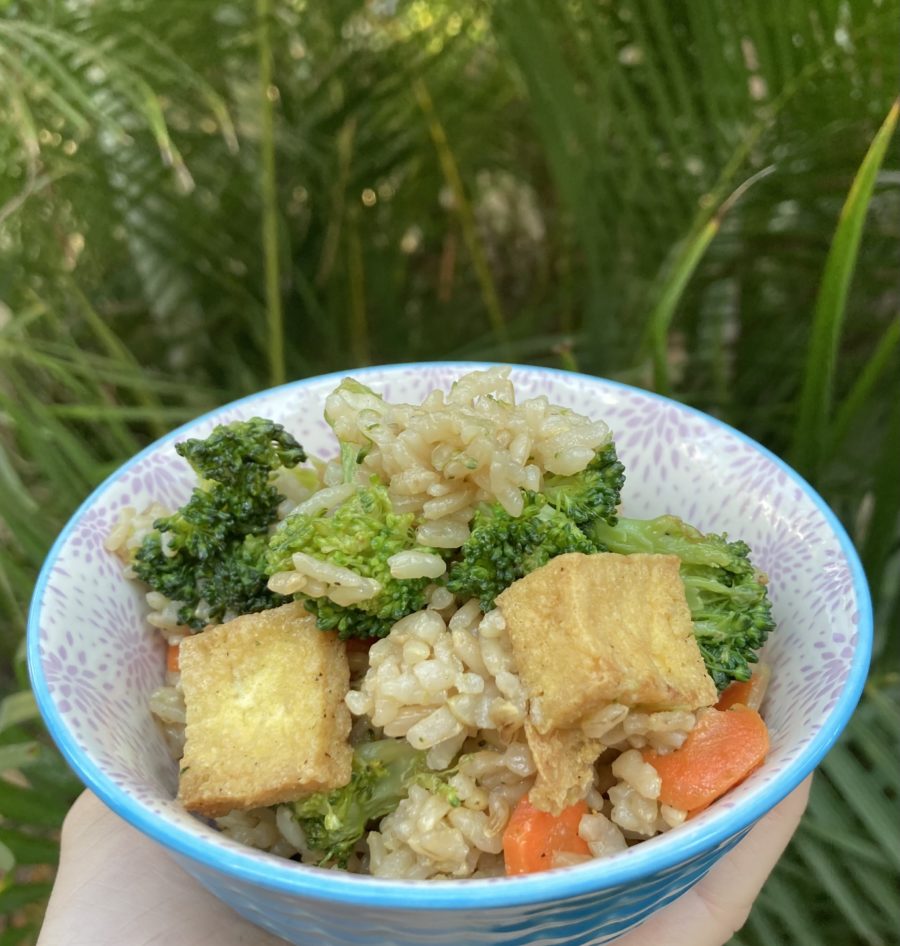
  9. Finish with any last-minute garnishes. I like to add chopped green onion. You can also at this point add your protein. I like to toss in some fried tofu. If you are not vegetarian, you can add cooked chicken or shrimp at this point.

Tips for the best fried rice:

  • If you don’t have cold rice leftovers, simply cook your rice and then scoop it into a container and place it in the freezer, lid off to cool quickly. I’ve done this a couple of times and it really helps to get that cold rice texture you’re looking for. Stir the rice every 5 minutes and keep it in the freezer for about 20 minutes or until it’s cool enough to use.
  • You can use any veggies you have on hand! I absolutely love fried rice because you literally can just throw all your veggies and old rice in and it still turns out delicious. I like to keep the colors bright, so I usually add carrot and at least one green veggie.
  • I love garlic and ginger, so I use generous amounts in my fried rice. If you are not as big a fan, feel free to add less.
  • I add tofu to my fried rice, but you can add any protein you like.

If you tried this recipe, let me know in the comments! Happy ‘kreating’!

Easiest Dalgona Coffee

Since quarantine and the world shut down, many new ideas and trends have taken over the internet. Dalgona coffee definitely was a 2020 sensation. To be honest, I only admired all the cool pictures and videos on the internet and never tried it, until today! After watching a few youtube videos, I decided I should give this drink a try. Of course, I needed to make it healthy so I used allulose as my sweetener and oat milk instead of dairy.

So here it is, the easiest way ever to make a healthy dalgona coffee…

  • 2 tbsp. instant coffee
  • 2 tbsp. allulose or your sweetener of choice
  • 2 tbsp. warm water
  1. Add all your ingredients into a blender bottle and give it a couple swirls to gently mix the ingredients. Place the metal mixer ball into the bottle and securely tighten the lid, making sure the cap is closed tightly. You don’t want to risk spilling this all over your kitchen!
  2. Start shaking the mixture vigorously and continue to do so for a few minutes. The color of the mixture will begin to change to a golden brown. Once you have a thick mixture that forms peaks, it’s ready to go!
  3. Pour some cold oat milk or your milk of choice into a glass. I filled mine about 3/4 full. Scoop the thick coffee mixture into the glass until it is completely full. Isn’t it so pretty? Stir the milk and coffee together and enjoy!

Please let me know if you tried this out… happy ‘kreating’!

Tofu Musubi

Aloha from sunny Hawaii!

If you have ever been to Hawaii, you probably tried a musubi once or twice. A musubi is a form of sushi made with white rice, a thin piece of spam, and wrapped in nori. It has soft rice, savory seaweed, and a salty piece of spam. I use to eat these and really loved them! Since I started eating vegetarian, I tried making a tofu musubi, imagining it would turn out gross. But to the surprise of my family and myself, these tofu musubis do not taste much different than an actual spam musubi!

Recipe:

  • 1 block of firm or extra firm tofu
  • 2 cups of cooked white sticky rice (brown rice may also be used – see note below)
  • Dried sushi seaweed
  • 1/2 cup Braggs liquid aminos
  • 2 tsp. maple syrup
  • 1 tsp. liquid smoke
  • 1 tsp. ground ginger puree
  • 1 tsp. minced garlic
  1. Press your tofu for 15-30 minutes to get all the unwanted liquid drained from the tofu
  2. Mix all the remaining ingredients in a shallow container to marinate your tofu slices
  3. Begin by slicing the tofu into thin rectangular pieces that resemble a piece of spam
  4. Marinate your tofu for 15 minutes
  5. Preheat a skillet on medium high and grease it before adding your slices of tofu
  6. Cook each piece until it begins to brown and get slightly crispy. Depending on how thin or thick you cut your tofu, it may take slightly longer to cook.
  7. While your tofu is cooking begin prepping to assemble your musubis
  8. Lay out a cut piece of seaweed (about 2-3 inches in width, 6-7 inches in length) and place your musubi press on top of it
  9. Begin by filling the press with your warm cooked rice and press. You will want at least an inch of evenly pressed rice
  10. Next, add your piece of cooked tofu and repeat with a layer of rice and press all together
  11. Once you have successfully filled your press with rice and tofu, wrap the seaweed around and seal with small dabs of water
  12. Continue this process until you have the amount of musubis you want. I used half a block of tofu and saved the other half.

How I make my brown rice:

Two cups of brown rice, rinse it well, add three cups of water and 1/4 cup of rice vinegar. Cook in a rice pot or on stove.

This recipe is really simple and easy to throw together for a lunch or a snack to take to the beach! I hope you try it out and let me know what you think.

Notes:

  • Brown rice is an alternative to white rice. To use brown rice, simply add rice vinegar to the rice before cooking. This method will make the rice stickier and easier to press.

Powered by WordPress & Theme by Anders Norén